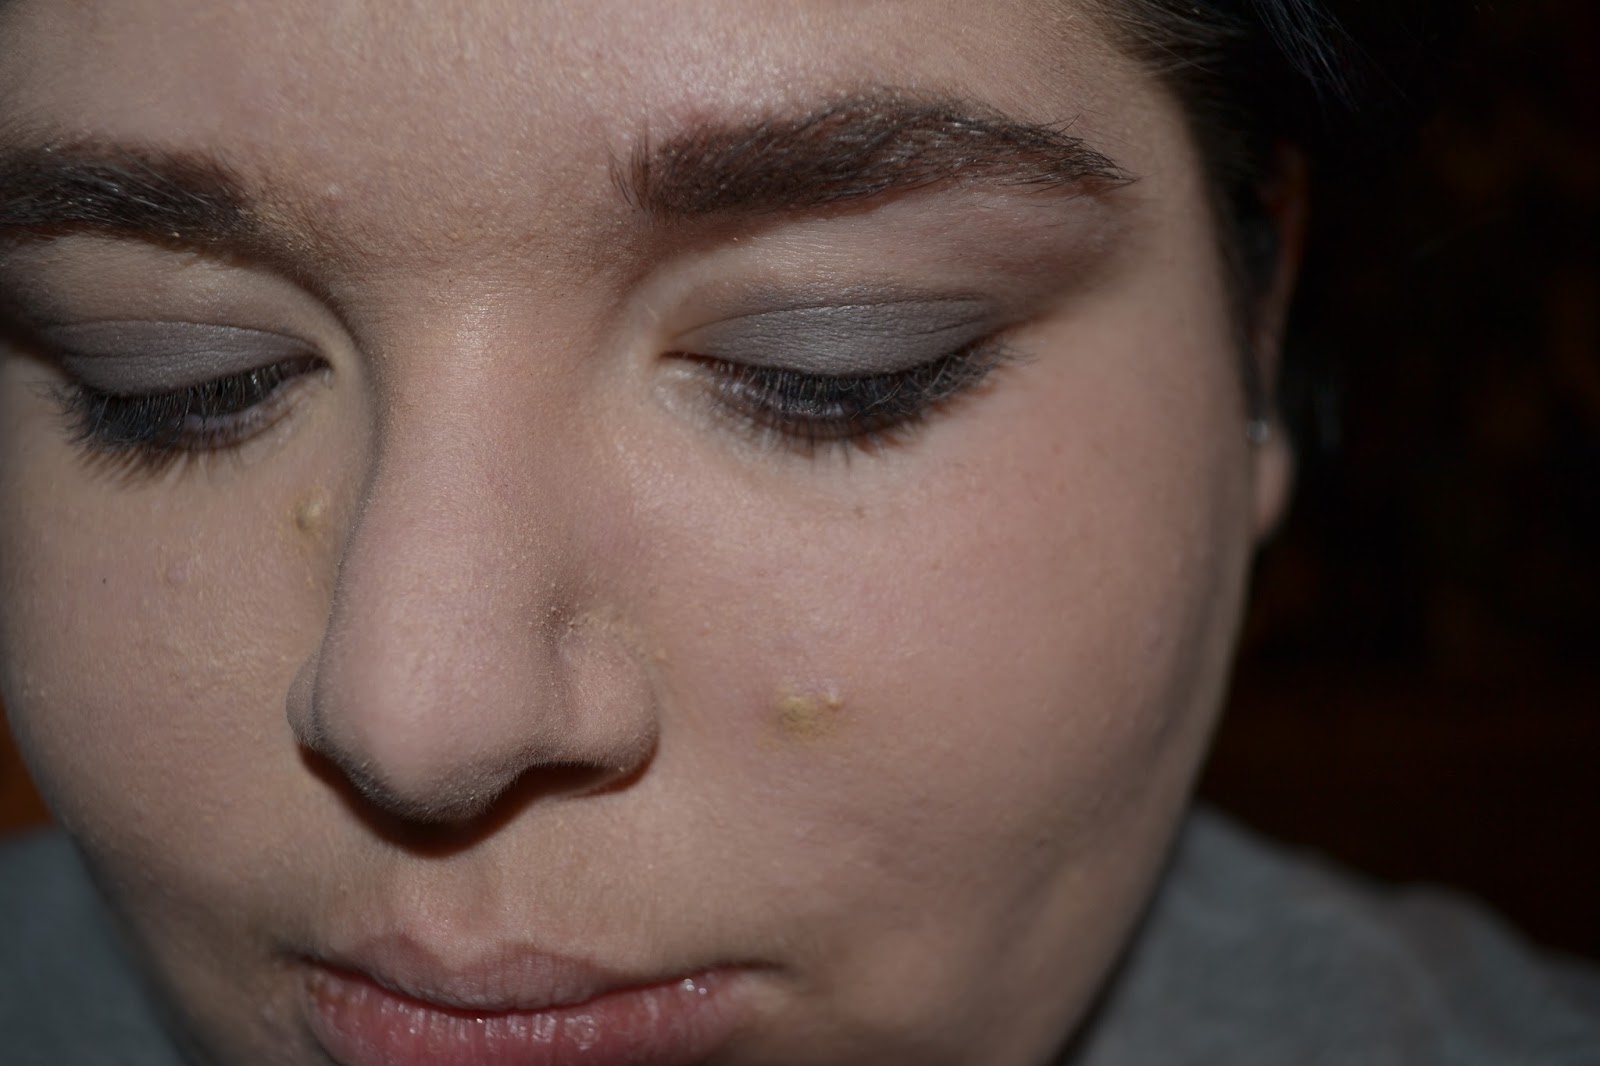
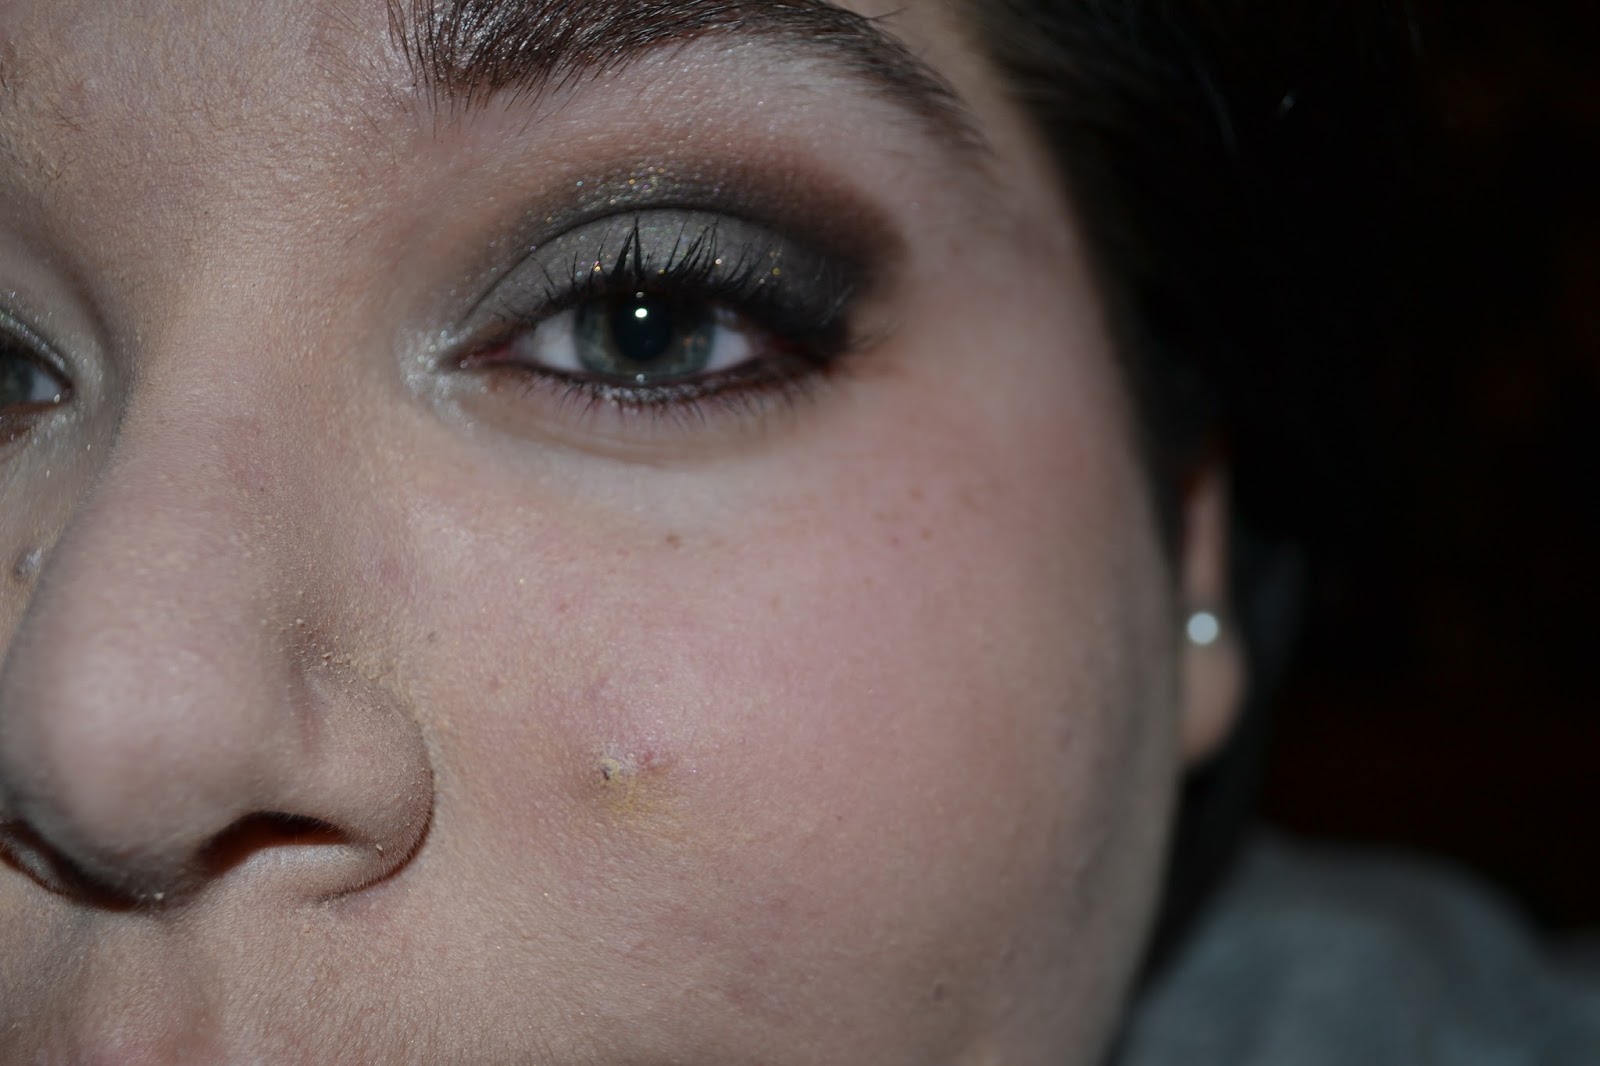
Hey guys! I'm here for a quick smokey eye I've been doing a lot lately for the fall time. I'll list all the products used at the end. Let's get started!
First prime you eye and add a dark brown with golden shimmer.
Then blend a light matte brown around the crease to blend the color out.
Next I added a slightly darker brown, again with some golden shimmer in the crease.
Then add a gold right in the middle of your lid, and a light soft cream golden shade to your inner corner and browbone.
Finally I added a dark matte brown gel liner, mascara, and false lashes!
Thanks for reading this short tutorial! Happy holidays :)
FACE:
Smashbox Photo Finish Foundation Primer
Urban Decay Urban Defense Tinted Moisturizer - Bodyguard
Hard Candy Glamoflauge - Medium/Light
Revlon Nearly Naked Powder - Light
Anastasia Contour Powder - Banana
CHEEKS:
Buxom Hot Escapes Bronzer - Tahiti
NARS Blush - Orgasm
Benefit High Beam
Anastasia Contour Powder - Sand
BROWS:
Anastasia Dipbrow Pomade - Chocolate
EYES:
MAC Paint Pot - Painterly
Urban Decay Naked Palette - Smog, Darkhorse, Naked, Half Baked
MAC Pigment - Vanilla
Unknown brand of gel liner
Ardell Demi Wispies
Just a southern girl blogging about her obsession. Contact info: Twitter - @mmaegantubbss Email - maegantubbs@gmail.com
Showing posts with label smokey. Show all posts
Friday, October 24, 2014
Tuesday, January 21, 2014
Smokey Eye Tutorial featuring Naked 2 Palette
Hey guys! I'm here with a heavy smokey eye tutorial using the Naked 2 palette from Urban Decay. I love playing with all three palettes, mixing and matching the colors. I will list every color and product I use as I go, so keep an eye out for that. Let's get started.
First start with a primed eye. I used Urban Decay Primer Potion. Then I blended Tease in the crease with a large fluffy brush. This doesn't have to be perfect, it's just a nice transition color.
Then with a flat shader brush, I added Verve all over the lid. Mainly focusing it on the inner and middle of the lid. And let me just say, this is my favorite color in this palette. It is so gorgeous.
The with a medium size brush I focused the color Pistol in the outer lid, not going in the crease though.
Then very carefully, I repeat very carefully, I added Blackout to the crease and outer V. I added this color bit by bit and softy blended it as I went. I also took the color on my lower lash line going a little thicker than usual.
Next I added Foxy to the brow bone and thick black gel liner on the top lash line. And white liner in the water line. Nothing fancy.
Finally I finished off this look with lashes from Eco Tools. I believe they are called Wispy & Flared. \
Thanks for reading!
First start with a primed eye. I used Urban Decay Primer Potion. Then I blended Tease in the crease with a large fluffy brush. This doesn't have to be perfect, it's just a nice transition color.
Then with a flat shader brush, I added Verve all over the lid. Mainly focusing it on the inner and middle of the lid. And let me just say, this is my favorite color in this palette. It is so gorgeous.
The with a medium size brush I focused the color Pistol in the outer lid, not going in the crease though.
Then very carefully, I repeat very carefully, I added Blackout to the crease and outer V. I added this color bit by bit and softy blended it as I went. I also took the color on my lower lash line going a little thicker than usual.
Next I added Foxy to the brow bone and thick black gel liner on the top lash line. And white liner in the water line. Nothing fancy.
Finally I finished off this look with lashes from Eco Tools. I believe they are called Wispy & Flared. \
Thanks for reading!
Tuesday, September 24, 2013
Reverse Smokey Eye Tutorial
Hey guys! I'm here today with a reverse smokey eye tutorial! It's pretty long, so let's get started!
First prime your eye with eyelid primer and then add a cream colored cream eyeshadow.
Then add an off white eyeshadow to the entire lid.
Then blend a medium brown in the crease. Try to make a soft cut crease.
Then I blended a dark brown in the outer v. And blended more. Then I added a shimmery white to the brown bone
Onto the 'reverse smokey' part! First I added a matte black to the entire lower lash line and connected it to the brown on the upper lash line.
Next I blended a red below the black. Then below that I blended an orange, and below that a yellow.
Finally I added thick black liner to my top lash line and white line to my waterline.
This step is totally optional but I added some nice full lashes!
Thanks for reading!
P.s. If you guys would like a false eyelash tutorial, let me know in the comments!
First prime your eye with eyelid primer and then add a cream colored cream eyeshadow.
Then add an off white eyeshadow to the entire lid.
Then blend a medium brown in the crease. Try to make a soft cut crease.
Then I blended a dark brown in the outer v. And blended more. Then I added a shimmery white to the brown bone
Onto the 'reverse smokey' part! First I added a matte black to the entire lower lash line and connected it to the brown on the upper lash line.
Next I blended a red below the black. Then below that I blended an orange, and below that a yellow.
Finally I added thick black liner to my top lash line and white line to my waterline.
This step is totally optional but I added some nice full lashes!
Thanks for reading!
P.s. If you guys would like a false eyelash tutorial, let me know in the comments!
Labels:
bh cosmetics,
eye,
eyeliner,
eyeshadow,
mac,
makeup,
reverse,
sephora,
smokey,
thebalm,
tutorial,
Urban Decay
Friday, September 13, 2013
Smokey Purple Eye Tutorial
Hey guys! I'm here today with a deep purple smokey eye tutorial. The products will be listed down below :)
Final Look
Now let's get started!
First prime your eye and use a white base.
Then add a dark purple to the lid. Don't go above the crease with this color.
Now blend a black in the crease with a small precision brush. Try to keep the shape that I did which will make a soft cut crease. Go all the way down to the inner corners with this color.
Then with a flat shader brush, add a light purple to the very center of your eye.
Then I lined my upper and lower lash line with the same black eyeshadow. Then I added black pencil liner to my waterline and mascara.
Thanks for reading!
Products used
Final Look
Now let's get started!
First prime your eye and use a white base.
Then add a dark purple to the lid. Don't go above the crease with this color.
Now blend a black in the crease with a small precision brush. Try to keep the shape that I did which will make a soft cut crease. Go all the way down to the inner corners with this color.
Then with a flat shader brush, add a light purple to the very center of your eye.
Then I lined my upper and lower lash line with the same black eyeshadow. Then I added black pencil liner to my waterline and mascara.
Thanks for reading!
Products used
- Ariel Palette (Sea Witch)
- Two Faced Romantic Eye (Cut the Cake, First Dance)
- Maybelline Flasies Flared Mascara
- Maybelline Line Express Eyeliner
- Urban Decay Primer Potion
- NYX Jumbo Eye Pencil in Milk
Close ups
Thursday, September 5, 2013
Soft Smokey Eye Tutorial
Hey guys! I'm here with a simple soft smokey eye tutorial. I used browns and taupe colors. It's incredibly easy, and my go to smokey eye. Products used will be listen at the end. Let's get started!
First start with a clean eyelid and prime with a cream taupe eyeshadow. This will act as our base and make the color stay put. Don't go above the crease with this color.
Then add a matte taupe eyeshadow on top to make it stay.
Then blend a light brown in the crease. It will transition the colors, and help with blending!
Then I added a dark brown to the outer V and blended in the crease. The key here is lots of blending :) And I would try to use all matte shadows so far.
Next I added a light sparkly silver color over the taupe, because who doesn't like to be sparkly?
Finally I added a white shimmery shadow in the inner corners and on the brow bone, then I added black liner to my water line and mascara. And you're done!
Products used
Close up of eyeshadow
Colors used
First start with a clean eyelid and prime with a cream taupe eyeshadow. This will act as our base and make the color stay put. Don't go above the crease with this color.
Then add a matte taupe eyeshadow on top to make it stay.
Then blend a light brown in the crease. It will transition the colors, and help with blending!
Then I added a dark brown to the outer V and blended in the crease. The key here is lots of blending :) And I would try to use all matte shadows so far.
Next I added a light sparkly silver color over the taupe, because who doesn't like to be sparkly?
Finally I added a white shimmery shadow in the inner corners and on the brow bone, then I added black liner to my water line and mascara. And you're done!
Products used
- BH Cosmetics 88 Matte Palette
- Maybelline Line Express Liner
- Maybelline Falsies Flared Mascara
- Maybelline Color Tattoo in Tough as Taupe
- Hottopic Shadow. No name is on it
- Silk Naturals Pigment in Fairy Dust
Close up of eyeshadow
Colors used
Labels:
bh cosmetics,
brown,
eye,
eyeshadow,
makeup,
matte,
Maybelline,
shimmer,
smokey,
soft,
tutorial
Wednesday, August 14, 2013
2 Looks, 1 Palette - BH Cosmetics 88 Matte
Hey guys! I'm here with another 2 looks, 1 palette post and today I'm using the BH Cosmetics 88 Matte Palette. And let me just say, this palette is amazing. I've had it for 2 years and it has amazing quality and variety of colors. So with that said, let's get started!
The first look is going to be green! I love using green eyeshadows, even though I have green eyes. The first thing you want to do and prime your eye with an eyeprimer.
Then sweep a light green all over the lid. The colors I used will be posted after each look.
Then blend a darker green in the crease. And add a lighter green than used on the lid and add it in the inner corner.
And finally add liner and mascara.
And here are the colors that were used.
2nd Look! This one is going to be a smokey eye. Usually when I do a smokey eye, I grab for my Naked palette, but this one was fun to try! First prime yo' eyes girl. You know the drill.
Then pat a silver color to your lid, not going above the crease.
Now this is where it gets tricky. Put black shadow in your crease and BLEND. Blending is key to a smokey eye.
Then you need to put a medium brown color above your crease and blend, blend, blend. This step is the most important in my opinion. It makes the colors blend easier and just look better.
Then I smudged a black pencil liner in the outer corner on the upper lash line and then put it in my waterline and then I added mascara. I also added a white shadow in the inner corner and brow bone for a highlight. Now you're done!
Colors used
Thanks for reading! :)
The first look is going to be green! I love using green eyeshadows, even though I have green eyes. The first thing you want to do and prime your eye with an eyeprimer.
Then sweep a light green all over the lid. The colors I used will be posted after each look.
Then blend a darker green in the crease. And add a lighter green than used on the lid and add it in the inner corner.
And finally add liner and mascara.
And here are the colors that were used.
2nd Look! This one is going to be a smokey eye. Usually when I do a smokey eye, I grab for my Naked palette, but this one was fun to try! First prime yo' eyes girl. You know the drill.
Then pat a silver color to your lid, not going above the crease.
Now this is where it gets tricky. Put black shadow in your crease and BLEND. Blending is key to a smokey eye.
Then you need to put a medium brown color above your crease and blend, blend, blend. This step is the most important in my opinion. It makes the colors blend easier and just look better.
Then I smudged a black pencil liner in the outer corner on the upper lash line and then put it in my waterline and then I added mascara. I also added a white shadow in the inner corner and brow bone for a highlight. Now you're done!
Colors used
Thanks for reading! :)
Subscribe to:
Posts (Atom)